

Installing a septic system is a significant project that requires careful planning and attention to detail. A septic system is essential for homes and buildings that are not connected to a public sewage system, as it helps safely and effectively dispose of waste. While it may seem like a daunting task, installing a septic system can be done successfully by following the right steps.
This article will guide you through the process of installing a septic system in ten easy-to-follow steps, accompanied by helpful pictures. From evaluating the site to obtaining permits and completing the installation, each step will be explained in detail, ensuring that you have a comprehensive understanding of the process.
It is important to note that installing a septic system requires knowledge of plumbing, excavation, and local regulations. If you are unsure or unfamiliar with any aspect of the process, it is always best to consult with a professional. However, for those who are willing to take on the challenge, this guide will provide you with the necessary information to install a septic system efficiently and safely.
Step 1: Assess the Site and Obtain Permits
Before installing a septic system, it is crucial to assess the site where the system will be placed. This involves evaluating the soil type, topography, and overall suitability of the area. A percolation test, also known as a soil test, is often conducted to determine the soil’s ability to absorb water. This information helps determine the size and type of septic system required for the site.
Obtaining the necessary permits is another essential step in the process. Different jurisdictions have specific regulations and requirements for septic system installations. It is crucial to contact the local health department or regulatory agency to understand the permit application process and any relevant guidelines that must be followed.
Once you have assessed the site and obtained the necessary permits, the actual installation process can begin. This initial step ensures that the septic system is installed in an appropriate location and complies with local regulations, ensuring its effectiveness and compliance in the long term.
Step 2: Excavate the Area for the Septic Tank

Once you have determined the location for your septic tank, the next step is to excavate the area. This process involves digging a hole that is large enough to accommodate the tank, as well as any necessary pipes and fittings. It is important to ensure that the hole is properly sized and level to allow for proper installation and functioning of the septic system.
Before beginning the excavation process, make sure to check for any underground utilities or obstacles that could interfere with the installation. Contact your local utility companies to have them mark any buried lines or cables. It is also important to obtain all necessary permits and approvals from local authorities before proceeding with the excavation.
Once you have obtained all necessary clearances, use a backhoe or excavator to dig the hole. The size of the hole will depend on the dimensions of the septic tank and any additional components. Make sure to follow the manufacturer’s instructions for the specific tank you are installing.
While excavating, it is important to maintain a level bottom for the tank and ensure proper slope for the inlet and outlet pipes. This will allow for efficient flow of wastewater through the system. Use a level and measuring tools to ensure accurate placement of the tank and pipes.
After the hole has been excavated, remove any loose soil or debris and check for any sharp objects or rocks that could potentially damage the tank. It is important to create a stable and clean environment for the tank, as any damage or contamination could lead to future problems with the septic system.
In some cases, the excavation process may also involve removing and relocating any trees, shrubs, or other landscaping features that may be in the way of the septic tank installation. Make sure to properly handle and dispose of any vegetation or debris in accordance with local regulations.
Once the excavation is complete, the next step is to properly prepare the hole for the installation of the septic tank. This may include adding a layer of gravel or sand to create a stable base for the tank, as well as installing any required reinforcement or support materials.
Step 3: Install the Septic Tank and Inlet/Outlet Pipes
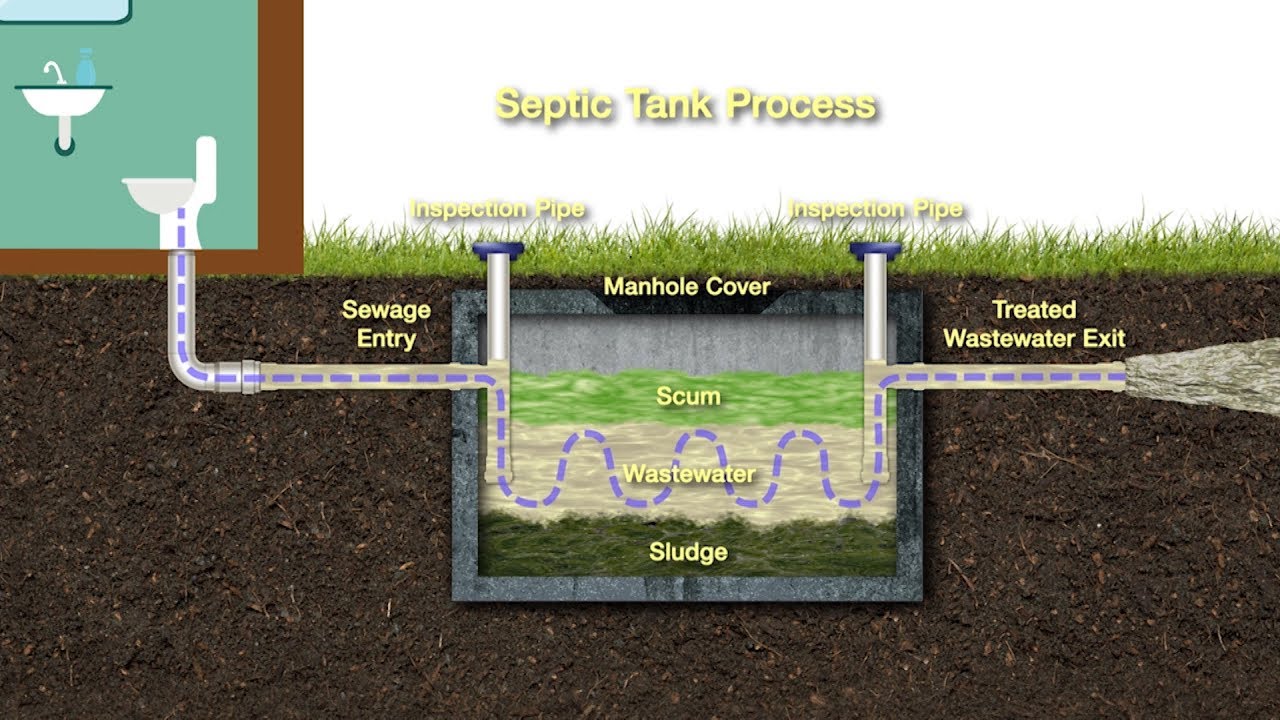
Once the excavation is complete and the ground has been properly prepared, it’s time to install the septic tank and the inlet/outlet pipes. This step is crucial as it ensures the proper functioning of the septic system.
1. Install the septic tank: The septic tank is the central component of the septic system. It is a large, watertight container that receives wastewater from the house and separates the solids from the liquids. To install the septic tank, carefully lower it into the excavated hole using a crane or other equipment. Make sure it is level and firmly supported before proceeding.
2. Connect the inlet and outlet pipes: Once the septic tank is installed, the next step is to connect the inlet and outlet pipes. The inlet pipe is connected to the house’s main sewer line, while the outlet pipe carries the treated wastewater away from the tank and into the drain field. These pipes should be properly aligned and securely attached to the septic tank to prevent any leaks or blockages.
It’s important to note that the installation of the septic tank and the inlet/outlet pipes should be done according to local regulations and guidelines. Hiring a professional septic system installer is highly recommended to ensure the proper installation and functionality of the septic system.
Step 4: Connect the Septic Tank to the Distribution Box
Once the septic tank has been properly installed and leveled, the next step is to connect it to the distribution box. This is an important step in the installation process as it ensures that wastewater is evenly distributed to the drain field.
To connect the septic tank to the distribution box, follow these steps:
- Locate the outlet pipe on the septic tank. This is the pipe that will connect to the distribution box.
- Measure and cut a section of PVC pipe that is long enough to reach from the septic tank outlet to the distribution box.
- Attach one end of the PVC pipe to the septic tank outlet using PVC primer and cement. Make sure the connection is tight and secure.
- Place the other end of the PVC pipe into the hole in the distribution box. Make sure the pipe is centered in the hole and extends to the bottom of the box.
- Secure the PVC pipe to the distribution box using PVC primer and cement. Again, ensure the connection is tight and secure.
Once the septic tank has been connected to the distribution box, it is important to check for any leaks. Run water through the septic system and inspect the connections for any signs of leakage. If any leaks are found, they should be repaired immediately to prevent further damage to the system.
Connecting the septic tank to the distribution box is a critical step in the installation process. By properly connecting these two components, you can ensure that wastewater is distributed evenly to the drain field, promoting the efficient and effective operation of your septic system.