

The Windsor knot is a classic and sophisticated way to tie a necktie. Named after the Duke of Windsor, this knot is known for its wide and triangular shape, making it perfect for formal occasions. Whether you have a job interview, a wedding, or a special event coming up, learning how to tie a Windsor knot will add a touch of elegance to your appearance.
If you’re new to tying knots, don’t worry – with a little practice, anyone can master the Windsor knot. All you need is a necktie and a mirror to follow along with these 8 easy steps. Once you’ve learned this knot, you’ll be able to tie it with confidence whenever you need to elevate your style.
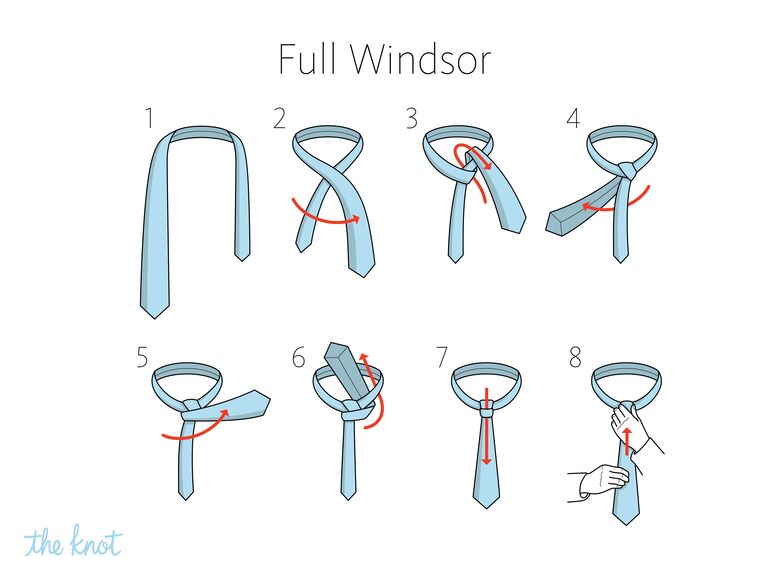
Step 1: Start by draping the necktie around your collar, with the wide end on the right and the narrow end on the left. Make sure that the wide end is about a foot longer than the narrow end. Cross the wide end over the narrow end, creating an X at the base of your neck.
Step 2: Take the wide end and bring it up through the X, towards your chin. Then, bring it down behind the narrow end.
Step 3: Bring the wide end back up and over the narrow end, moving from left to right. This will create a loop on the left side of the knot.
Step 4: Take the wide end and bring it underneath the narrow end from right to left. This will create another loop on the right side of the knot.
Step 5: Bring the wide end back up and over the loop on the left side of the knot. Then, tuck it down through the loop on the right side of the knot.
Step 6: Hold the knot with one hand and carefully pull on the narrow end to tighten the knot. Make sure the knot is centered and snug, but not too tight.
Step 7: Adjust the knot by holding both ends of the tie and sliding the knot up towards your collar. This will create a neat and symmetrical appearance.
Step 8: Finally, tuck the narrow end into the loop on the back of the wide end. Make sure the end is hidden and securely tucked in.
Congratulations! You have successfully tied a Windsor knot. With a little practice, you’ll be able to tie this knot effortlessly and impress everyone with your sharp look. Remember, the Windsor knot is a timeless choice that exudes confidence and sophistication.
Step 1: Prepare the Necktie
Before you begin tying the Windsor knot, it is important to ensure that your necktie is ready and in good condition. Follow these steps to prepare your necktie:
- Select a Suitable Necktie: Choose a necktie that matches your outfit and is appropriate for the occasion. Make sure the necktie is long enough to reach your waist when it is draped around your neck.
- Straighten the Necktie: Lay the necktie on a flat surface and straighten any wrinkles or creases. This will give your knot a sleek appearance.
- Flip the Collar: Lift your shirt collar up and flip it before wearing the necktie. This will provide a clean and polished look.
- Place the Necktie: Drape the necktie around your neck with the wider end on the right side and the narrow end on the left side. Position the ends so that the wide end hangs about 12 inches below the narrow end.
By following these steps, you will ensure that your necktie is prepared and ready for the next step in tying the Windsor knot.
Step 2: Cross the Wide End Over the Narrow End
In this step, you will begin to create the shape of the Windsor knot by crossing the wide end of the tie over the narrow end. Make sure the wide end is slightly longer than the narrow end.
Here are the simple steps to follow:
- Hold the wide end of the tie in your right hand and the narrow end in your left hand.
- Bring the wide end over the narrow end from right to left, crossing it at the center of your neck.
- Ensure that the wide end is now pointing towards the left side of your body.
- Hold the crossed ends firmly in place with your left hand to maintain the shape.
It’s important to keep the crossed ends secure as you move on to the next step. This will ensure that the knot forms correctly and stays in place throughout the day. Pay attention to the length of the tie, making sure the wide end is longer than the narrow end to achieve the desired look.
Step 3: Bring the Wide End Up and Through the Loop
Now that you have the narrow end in your left hand and the wide end hanging down on your right side, it’s time to bring the wide end up and through the loop. This step is crucial in creating the Windsor knot, which is known for its symmetrical and large appearance.
1. Take the wide end of the tie with your right hand and bring it across the front of the knot towards your left shoulder. The wide end should be behind the narrow end at this point.
2. Hold the wide end of the tie with your left hand and bring it up towards your neck, passing it through the loop that was formed by the previous steps. The wide end should now be on your left side, while the narrow end remains on your right side.
3. Pull the wide end all the way through the loop, ensuring that it goes over the narrow end and comes out from behind. This will create a diagonal line across the front of the knot.
4. Adjust the knot by holding the narrow end and sliding the knot up towards your collar. At this point, the wide end should be shorter than the narrow end.
5. To complete the Windsor knot, proceed to the next step: “Step 4: Bring the Wide End Over and Through the Loop”.
Step 4: Cross the Wide End Over the Narrow End Again
After completing step 3, you will have the wide end of the tie over the narrow end. To create a Windsor knot, you need to cross the wide end over the narrow end one more time.
Here’s a recap of the steps we’ve completed so far:
- Start with the wide end of the tie on your right side, extending about 12 inches below the narrow end.
- Cross the wide end over the narrow end and bring it up and through the loop around your neck.
- Bring the wide end down and around behind the narrow end, forming a horizontal loop.
Now, let’s move on to the next step:
- Take the wide end of the tie and cross it over the narrow end once again, from right to left. The wide end should now be pointing towards your right shoulder.
By crossing the wide end over the narrow end again, you are creating the structure for the final steps of the Windsor knot.