
If you’re building a new home or considering replacing an old septic system, it’s important to understand the installation process. Installing a septic system may seem like a daunting task, but with the right knowledge and preparation, it can be done successfully. In this article, we will outline the key steps involved in installing a septic system, along with helpful pictures to guide you along the way.
Step 1: Evaluate the site – Before beginning the installation, it’s crucial to assess the site where the septic system will be placed. Factors like soil type, slope, and proximity to water sources need to be taken into consideration to ensure proper functioning.
Step 2: Obtain necessary permits – Contact your local health department to determine what permits and inspections are required for the installation of a septic system. This step is important to ensure compliance with local regulations and to avoid potential legal issues down the line.
Step 3: Design the system – Work with a professional engineer or a septic system designer to create a detailed plan for your septic system. The design should consider the size of your household, the water usage, and the soil conditions on your property.
Step 4: Excavate the area – Once the design is finalized, it’s time to prepare the site for installation. This typically involves excavating the area where the septic tank and drain field will be located. Be sure to follow the design specifications and local guidelines during this step.
- Step-by-Step Guide on Installing a Septic System
- 1. Determine the System Type
- 2. Obtain Permits
- 3. Site Evaluation
- 4. Design the System
- 5. Excavation
- 6. Install the Septic Tank
- 7. Construct the Drain Field
- 8. Connect the Pipes
- 9. Backfill and Compact
- 10. Test and Inspect
- Evaluate and Plan for the Septic System Installation
- Obtain the Necessary Permits and Regulatory Approvals
- Steps to obtaining the necessary permits and regulatory approvals:
- Choose the Right Septic Tank and Drainage Field Area
Step-by-Step Guide on Installing a Septic System
Installing a septic system is an essential step in providing a safe and efficient way to manage your household wastewater. Here is a step-by-step guide on how to install a septic system:
1. Determine the System Type
The first step is to determine the type of septic system that is appropriate for your property. Factors to consider include soil type, water table level, and local regulations. Consult with a professional to determine the best system for your needs.
2. Obtain Permits
Before proceeding with installation, it is crucial to obtain the necessary permits and approvals from the local regulatory authority. This ensures that your septic system meets all safety and environmental standards.
3. Site Evaluation
The next step is to evaluate the site where the septic system will be installed. This involves assessing the soil composition, topography, and available space. A percolation test may also be conducted to determine the soil’s ability to absorb water.
4. Design the System
Based on the site evaluation, a septic system design is created. This includes determining the tank size, drain field layout, and other components required for proper wastewater treatment and disposal. It is essential to comply with local regulations and industry standards during the design process.
5. Excavation
Excavate the area where the septic tank and drain field will be located. This involves removing soil and creating a level area for the installation. Ensure that all necessary safety precautions are taken during excavation.
6. Install the Septic Tank
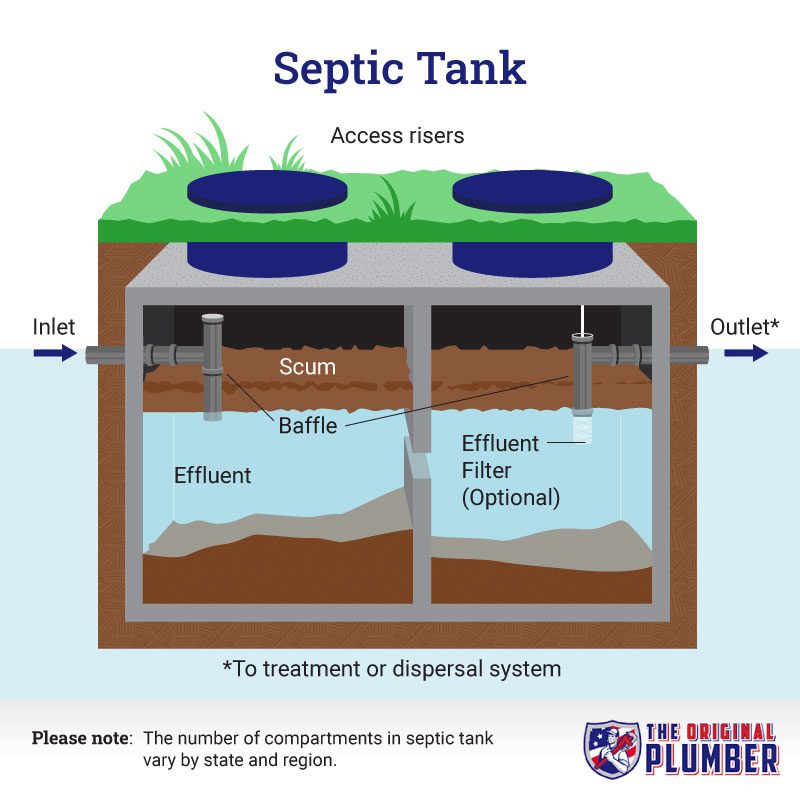
Place the septic tank in the excavated area and connect it to the inlet and outlet pipes. Ensure that the tank is properly leveled and securely positioned. Follow manufacturer guidelines for the installation process.
7. Construct the Drain Field
Next, construct the drain field by laying perforated pipes in trenches filled with gravel or crushed stone. These pipes distribute the treated wastewater into the soil for further purification. The drain field size and layout should adhere to the septic system design.
8. Connect the Pipes
Connect the pipes from the septic tank to the drain field. Use watertight fittings and ensure proper slope for efficient flow. It is crucial to follow the design specifications and local regulations when connecting the pipes.
9. Backfill and Compact
After the pipes are connected, backfill the excavated area around the septic tank and drain field. Compact the soil in layers to avoid settling in the future. Ensure proper compaction to prevent damage to the system.
10. Test and Inspect
Once the installation is complete, the system should be tested and inspected to ensure proper functioning. This may involve checking for leaks, measuring water flow rates, and verifying compliance with regulatory requirements. Regular maintenance and inspections should also be scheduled to prolong the lifespan of the septic system.
By following these steps, you can successfully install a septic system that meets all safety and environmental standards, providing a reliable wastewater management solution for your property.
Evaluate and Plan for the Septic System Installation
Before installing a septic system, it is crucial to evaluate the property and plan accordingly. This process includes considering various factors, such as the size of the property, soil conditions, and local regulations.
1. Determine the property size: Start by determining the size of the property to determine the appropriate septic system size. Larger properties may require larger septic systems to handle the wastewater adequately.
2. Conduct a soil test: A soil test will help determine the type and condition of the soil. Different soil types have varying levels of permeability, which can affect the septic system’s design and installation requirements.
3. Check local regulations: Research local regulations regarding septic system installations to ensure compliance. Different areas have specific guidelines and permits that must be followed when installing a septic system.
4. Hire a professional: Consider hiring a professional septic system designer or engineer who can assess the property and provide expert recommendations. They will help determine the best location for the septic system based on the property’s characteristics.
5. Consider future needs: When evaluating and planning for a septic system installation, consider any potential future needs. If there are plans for property expansion or an increase in the number of occupants, a larger septic system may be necessary.
6. Create a layout and design plan: Once all necessary information has been gathered, create a detailed layout and design plan for the septic system installation. This plan should include the location of the septic tank, drain field, and any necessary pipes and distribution boxes.
7. Obtain the necessary permits: Before starting the installation process, it is essential to obtain all necessary permits from local authorities. This ensures that the septic system installation is in compliance with regulations and codes.
By carefully evaluating and planning for the septic system installation, property owners can ensure a successful and efficient process. This helps prevent potential issues and ensures the septic system functions effectively for years to come.
Obtain the Necessary Permits and Regulatory Approvals
Before beginning any septic system installation, it is essential to obtain the necessary permits and regulatory approvals from the appropriate governing authorities. These permits ensure that the installation follows all applicable regulations and guidelines, protecting both public health and the environment.
Start by contacting your local health department or environmental protection agency to determine the specific permits and approvals required for your area. They will provide you with the necessary application forms and inform you of any fees that may be associated with the process. It is important to budget for these fees and allocate enough time for the approval process, as it can vary depending on your location.
Steps to obtaining the necessary permits and regulatory approvals:
- Research local regulations: Familiarize yourself with the local regulations and guidelines for septic system installations. This will help you understand the requirements and ensure that your installation complies with all necessary standards.
- Complete permit applications: Fill out the permit applications provided by the local health department or environmental protection agency. Be sure to provide all required documentation and information accurately and thoroughly.
- Submit applications and fees: Submit the completed permit applications along with any required fees. Make sure to keep copies of all documents for your records.
- Attend inspections or meetings: Depending on the regulations in your area, you may be required to attend inspections or meetings with governing authorities. Be prepared to answer any questions and provide additional information as needed.
- Receive approval: Once your applications have been reviewed and deemed compliant, you will receive the necessary permits and regulatory approvals. These documents will specify any conditions or requirements that must be met during the installation process.
By obtaining the necessary permits and regulatory approvals before starting the septic system installation, you can ensure that your project proceeds smoothly and avoid potential legal issues or fines. It is always better to comply with the regulations from the beginning than to try and rectify any violations later on.
Choose the Right Septic Tank and Drainage Field Area
Choosing the right septic tank and drainage field area is crucial for the proper functioning of your septic system. Here are some important factors to consider:
1. Size of the tank: The size of the septic tank should be determined based on the number of bedrooms in your home or the anticipated water usage. It is important to choose a tank size that can accommodate the waste generated by your household.
2. Material of the tank: Septic tanks are available in different materials such as concrete, fiberglass, and plastic. Each material has its own advantages and disadvantages. Concrete tanks are durable but may require periodic maintenance. Fiberglass tanks are lightweight and resistant to corrosion. Plastic tanks are easy to install but may not be as durable as concrete or fiberglass.
3. Drainage field area: The drainage field is where the treated effluent from the septic tank is dispersed and naturally filtered through the soil. The size of the drainage field will depend on the porosity of the soil, the water table level, and the estimated water usage. It is important to choose an area that has suitable soil conditions for effective waste disposal.
After considering these factors, it is advisable to consult a professional septic system installer or engineer who can assess your site conditions and recommend the appropriate septic tank and drainage field area.
Overall, selecting the right septic tank and drainage field area is essential for the long-term functionality and efficiency of your septic system. Proper planning and consideration of these factors will help ensure that your septic system operates effectively and minimizes the risk of potential problems in the future.